Unlock Stunning Image Editing: How to Use Cutout Pro Free to Customize Your Pictures
Introduction
In today’s digital era, effortlessly isolating subjects and removing backgrounds is crucial—and cutout pro free offers a powerful, no-cost solution. Whether you’re a blogger, marketer, or hobbyist photographer, cutout pro free delivers easy background removal and refined cutouts that save time and elevate visuals. This introduction to cutout pro free previews the seven subheadings ahead, each shining a light on a key aspect of using cutout pro free to improve your image editing skills and creativity. Let’s dive into how cutout pro free can transform your workflow and results.
Getting Started and Installation Guide
Getting started with cutout pro free is quick and straightforward. First, navigate to the official Cutout Pro website and look for the free version. Download the installer compatible with your operating system—whether Windows, macOS, or even your browser-based version if available. Installing cutout pro free only takes a few minutes; just follow the on-screen prompts. Once installed, launch cutout pro free, and you’ll be greeted by an intuitive interface designed to streamline background removal. Make sure your system meets the minimum requirements specified by cutout pro free’s documentation, such as supported file formats and RAM. In no time, cutout pro free will be installed and ready for your creative projects.
Key Features You’ll Love
The cutout pro free version includes an impressive array of features, many of which you’d expect from premium tools. You’ll enjoy automatic background removal with smart AI algorithms that distinguish between fine details like hair or fur and complex backgrounds. cutout pro free also offers manual refinement tools—brushes, erasers, and edge-refinement sliders—so you can perfect nearly any cutout with precision. It supports multiple image formats (JPEG, PNG, TIFF), batch processing to save time, and simple export options that preserve quality. Whether you’re working with portraits or product shots, cutout pro free gives you pro-level control at zero cost, making it a compelling choice for beginners and experienced users alike.
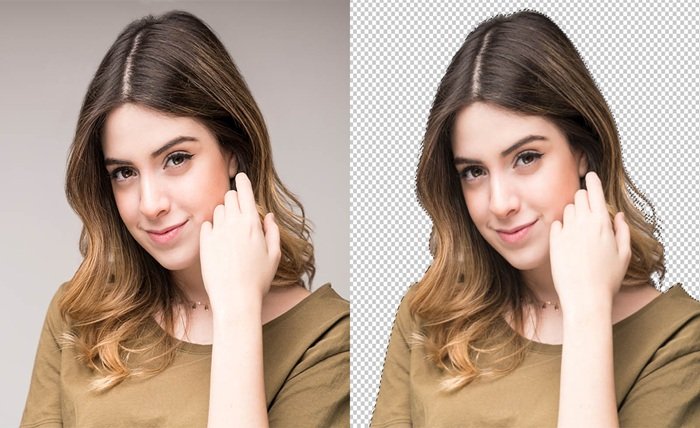
Step-by-Step Background Removal Process
Using cutout pro free for background removal is intuitive when you follow this step-by-step approach. First, open your image in cutout pro free. The tool automatically generates a masked layer. Next, use the “Auto Remove” button for general cuts. For fine detail—like hair strands or intricate edges—switch to manual mode. Use the “Refine Edge” brush in cutout pro free to smooth or sharpen transitions. Adjust sliders—Edge Smoothness, Feather, Shift Edge, and Contrast—until the object stands crisply against no background. If there are leftover artifacts, grab the “Erase” brush and remove them precisely. Once satisfied, export your image as a PNG to preserve transparency. cutout pro free ensures each step is user-friendly, guiding you seamlessly from start to finish.
Creative Uses Beyond Background Removal
The functionality of cutout pro free extends far beyond basic background removal. You can isolate objects to create composites—say, placing a person over a new scenic background. With cutout pro free, inserting product images into marketing mockups becomes effortless. For bloggers, cutout pro free allows you to overlay cutouts onto blog headers, infographics, or thumbnails. Social media creators benefit too: isolate subjects for Instagram posts, stories, or TikTok overlays with cutout pro free for added visual impact. Creative advertisers can insert cutout objects into themed layouts. Ultimately, cutout pro free empowers creative professionals and social media users to repurpose images across platforms with transparent ease.
Tips for Improving Accuracy and Speed
Maximize the accuracy and speed when using cutout pro free by applying these practical tips. First, start with high-contrast images—sharp outlines between subject and background let cutout pro free’s AI perform better. When working with complex hair or edges, zoom in and use the refine-edge tools in cutout pro free patiently—small strokes yield cleaner results. Don’t forget to save presets in cutout pro free for recurring projects; this reduces manual work. Batch processing in cutout pro free is also your friend for multiple images—set your desired refinement level once, and apply it to the whole batch. Finally, optimize your computer’s performance (close background apps) to ensure cutout pro free runs faster and smoother, especially on larger files.
Paid Alternatives: What You Gain and What You Miss
Comparing cutout pro free with paid tools helps you understand its value. Compared to professional paid software like Photoshop or Luminar, cutout pro free offers comparable background removal with simpler UI and zero cost. The swing toward cutout pro free is low barrier and quick learning—no subscriptions required. However, paid alternatives may offer deeper color grading, layer control, or integrated filters—features missing in cutout pro free. Workflow-wise, cutout pro free speeds up background removal but may fall short on advanced batch retouching. For most casual users, marketers, or small business owners, cutout pro free delivers the essentials. Pros using high-end photo manipulation might opt for paid packages—but cutout pro free is a smart, no-cost gateway to powerful editing.
Troubleshooting and Best Practices
Even with its ease, cutout pro free can present occasional hiccups—let’s troubleshoot some common issues and share best practices. If cutout pro free fails to remove certain background sections, ensure your image is high resolution and well-lit; shadows confuse the AI algorithm. When the “Auto Remove” tool in cutout pro free misses parts, switch to manual refine brushes and edge-smoothing sliders. If performance lags, reduce export resolution temporarily or use batch mode in cutout pro free to process smaller sets. Encounter a crash or frozen app? Update cutout pro free to the latest version or reinstall after clearing cache. Lastly, save frequently—even though cutout pro free is stable, accidents happen. Adopting these cutout pro free best practices ensures a smooth, frustration-free experience.
Conclusion
In summary, cutout pro free stands out as a powerful, accessible tool for anyone needing quick, effective background removal. With its intuitive interface, AI-powered auto removal, manual refinement tools, batch processing, and creative flexibility, cutout pro free empowers you to transform images with ease. Whether repurposing photos for social media, marketing, blogs, or personal projects, cutout pro free delivers professional-level results—without a price tag. Stick to high-contrast inputs, take advantage of refine tools, and leverage batch exports. In embracing cutout pro free, you’re choosing productivity, creativity, and affordability in one elegant tool.
FAQs
What platforms support cutout pro free?
cutout pro free is typically available for Windows, macOS, and sometimes as a web application—check the official site for the latest supported platforms.Is cutout pro free really free?
Yes, cutout pro free provides a no-cost option; however, there may be optional premium upgrades or paid tiers with additional features.Can I use cutout pro free for commercial projects?
In most cases, yes—cutout pro free allows commercial use. Just confirm the licensing terms on the official website to ensure compliance.Does cutout pro free support batch image editing?
Absolutely—cutout pro free includes batch processing to apply background removal and refinement across multiple images with ease.What if cutout pro free doesn’t remove the background cleanly?
If cutout pro free misses parts of the background, try improving image contrast, using manual refine brushes, adjusting edge-smoothing sliders, or checking for the latest version to ensure optimal results.